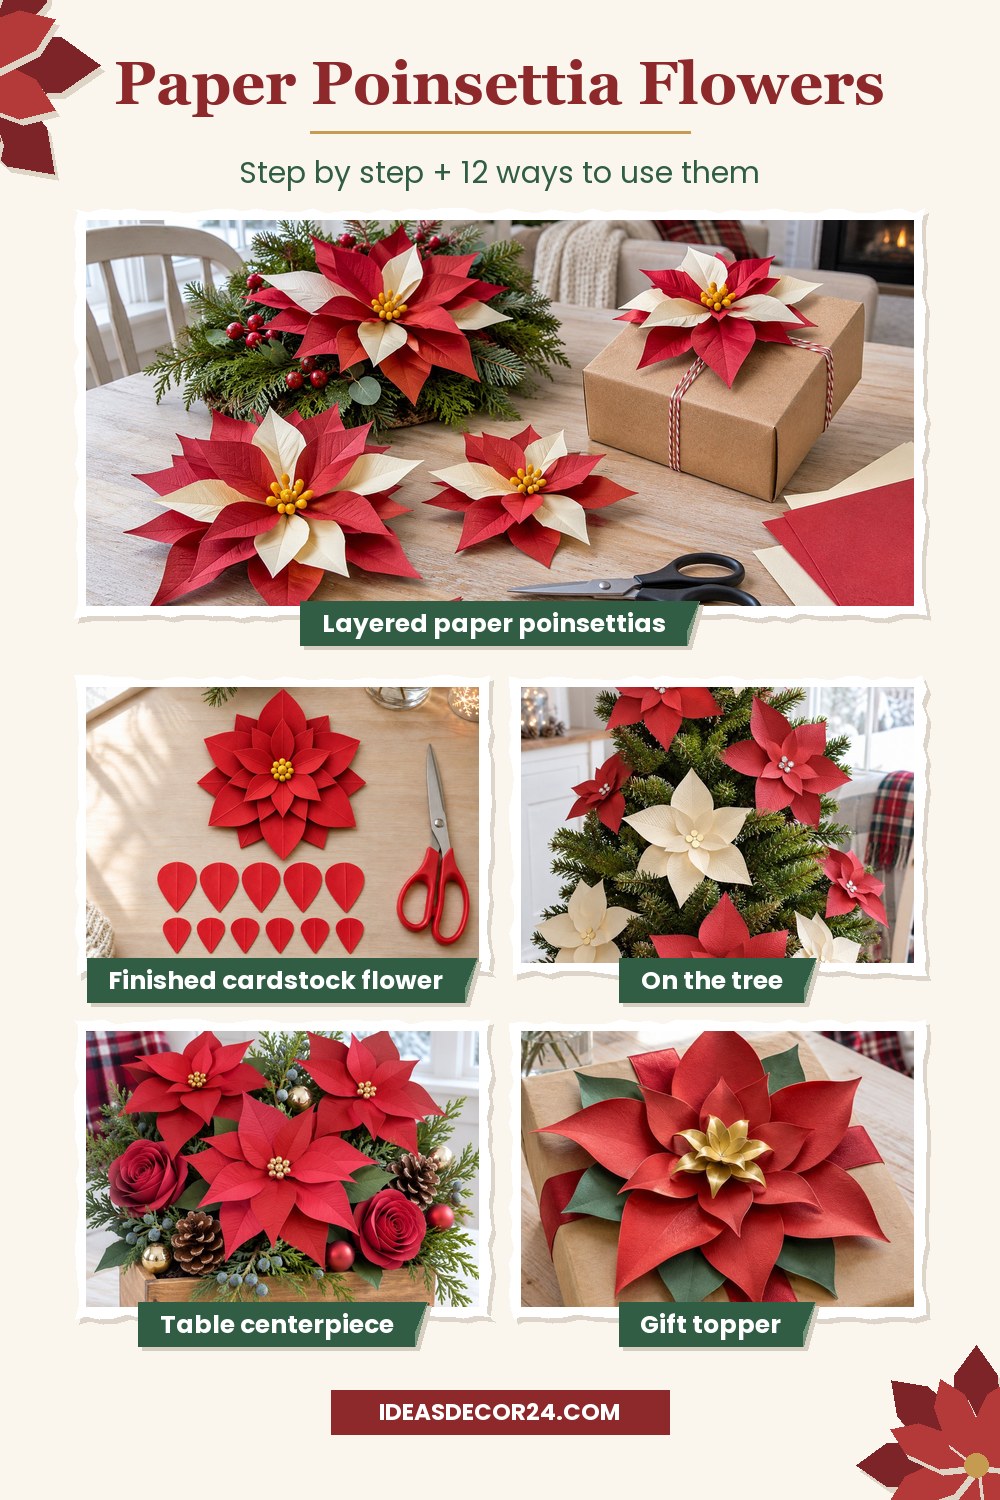
A paper poinsettia recreates the Christmas flower with pointed paper petals and a bright center. Cardstock gives the layers crisp folds; crepe paper creates softer, shaped blooms. Start with the layered cardstock flower below: cut, score, rotate, glue, and add a yellow center. Then explore 12 ways to use a DIY paper poinsettia, grouped by where it goes: the tree and wreath, table, gifts and cards, and walls and windows.

How to Make a Layered Cardstock Poinsettia


Follow the open written instructions and adjustable template from BoxTemplate, BoxTemplate. Gather red cardstock, yellow paper, and white (PVA) glue for cardstock. The default template makes a flower 5.7 inches (145 mm) across, with two six-petal layers; the source also suggests a third layer for fullness. Print the template at actual size to preserve those proportions.
- Print the template for two sizes of red petal layers, adding a third for fullness.
- Cut the red petal layers along the solid lines.
- Cut the center piece from yellow paper.
- Crease each petal along the dashed line into a shallow ridge.
- Place the smaller layer over the larger, rotating its petals into the gaps.
- Glue the cardstock layers together with white (PVA) glue.
- Glue the yellow center on top to finish the flower.
For a moving demonstration, watch Abbi Kirsten Collections make small paper poinsettias. The video offers another view of cutting and assembling a dimensional flower, useful when a still photograph leaves the layering unclear. Follow the written template above for that specific cardstock version.
On the Tree and the Wreath
Tree-tucked ornaments. Cut pointed petals from textured red or cream cardstock and build them on a small paper-plate circle. Sarah uses six larger petals underneath three smaller ones, with jewels or punched scrapbook paper in the center. Bend the petals upward for dimension, then tuck the completed flower directly between tree branches. Her version needs no hanging string: the flower itself sits among the greenery, with the paper circle hidden behind its petals. Sarah (Thrifty Decor Chick), U Create

Ribbon-wrapped wreath. Use Lexy’s downloadable flower pattern, colored cardstock, brads, ribbon, and a wreath form. Each bloom begins with two flower cutouts; punch their centers, bend the petals in alternating directions, and secure the layers with a small circle and a brad. Wrap the wreath form with ribbon before hot-gluing the flowers into place. Overlap the leaves and flowers as she does to cover the form and create a full ring. Lexy, The Proper Blog
Crepe holly tree garland. Build Abbi Kirsten’s garland from crepe paper, floral wire, floral tape, and pearl stamen clusters. Cut the petal halves with the grain running diagonally, then overlap the halves with hot glue, sandwiching a thin wire between them. Assemble the flowers around covered stamens and tape the holly leaves along a thicker wire base. Her example is 5 feet [1.52 m] long; hook the flowers around the finished leaf garland and style it through the tree. Abbi Kirsten, Abbi Kirsten Collections
On the Table
Container centerpiece with greenery. Daisy combines red paper poinsettia flowers with juniper, pine cones, ornaments, and cardstock roses in a container. Glue floral foam into the base, insert the stemmed flowers first, then fill the spaces with foliage and the remaining decorations. The flower stems can be bamboo or covered floral wire. Her illustrated arrangement uses fresh juniper, while the written materials list also allows artificial or preserved greenery for the same container-based project. Daisy, Daisy Multifacética

Decoupaged napkin rings. Gail’s napkin-ring idea is one of several projects in her November 2026 archive, which includes the complete tutorial. Separate the printed layer of a poinsettia napkin, seal it with Mod Podge, and adhere it to red foam. Cut toward the center between petals, then warm the foam briefly on an iron or griddle at its lowest setting before shaping it on a cushion. Add six center beads, dry overnight, and glue the flower to a napkin ring; handle heated tools carefully. Gail, Purple Hues and Me
Ribbon-backed floral table runner. Lynn Lilly’s giant poinsettia garland can also lie along a dining table, as her instructions explicitly suggest. Use colored paper, paper glue, hot glue, pom-poms, and ribbon 3–4 inches [7.6–10.2 cm] wide. Cut a slit at the base of each petal and overlap the sides with paper glue to add dimension. Build the flowers on paper circles and fill their centers with pom-poms. Glue the completed blooms onto the ribbon, then add folded holly leaves around and between them. Lynn Lilly, Astrobrights
On Gifts and Cards
Sculpted package flower. Amanda McGee’s cardstock poinsettia is designed to adorn a gift package as well as a wreath or floral arrangement. Cut the red petals, green leaves, and yellow or gold center pieces, then curve them with a stylus or craft stick. Glue the layers with their points offset, pressing them together with the stick as you work. Fold the center petals upward and turn their tips outward. Stack the two gold or yellow centers, glue them into the flower, and gently bend the assembled center. Amanda McGee, Amanda McGee Designs

Cream flower greeting card. Patricia Dolan’s card pairs a cream poinsettia with patterned paper, an embossed cream strip, and ribbon. Die-cut and emboss three petal layers, lightly sponge them with ink, and attach them with their points offset. Add the brown cardstock center and two green leaves. Wrap ribbon around the strip and patterned-paper panel before attaching that panel to the card base, then mount the flower with dimensionals, then adhere the leaves with dimensionals. Patricia Dolan, P.S. Paper Crafts
Paper gift card holder trim. Kristi Ann specifically suggests adding her scored poinsettia to a paper gift card holder. Use red and green cardstock, craft glue, and either the included yellow paper circles or adhesive rhinestones. Change the appropriate layers from “Basic Cut” to “Score,” use Attach to connect them to their corresponding cut shapes, and cut the pieces with a cutting machine. Fold on the score lines before gluing the flower together, arranging the green layers diagonally across one another. Kristi Ann, SVG Nation
On Walls and Windows
Giant flower photo backdrop. Jennifer’s oversized poinsettia uses red, green, and gold cardstock, hot glue, and removable mounting strips for a wall or photo backdrop. Shape each petal by overlapping its base into a cup, then glue the largest petals onto the base in a five-pointed star. Fill the gaps with the following layers, add the yellow stamens from largest to smallest, and tuck the green leaves between the backing and the outer petals. Jennifer, Jennifer Maker

Tape-backed window flowers. Sarah also gives a window-display option for her cardstock poinsettias: attach tape to their backs and position them on the glass. Build the flowers on paper-plate circles, with textured petals and either jeweled or punched-paper centers. Her ornament tutorial explains the same assembly used here, including bending the petals upward after gluing. This version uses each flower as an individual window decoration, with the tape applied behind the supporting circle. Sarah (Thrifty Decor Chick), U Create
Layered shadow box. Sarah’s shadow box sets a dimensional poinsettia against patterned scrapbook paper. Cut the card pieces, fold the red and green shapes along their middle lines, and assemble them over the backing. She glues the bottom leaf layer and uses foam squares above it for depth; the remaining layers can use craft glue, hot glue, or foam pads. Finish with the yellow or gold center and place the assembled design in its square frame. Sarah, Craft with Sarah
Which Paper to Use
For the scored flower, BoxTemplate, BoxTemplate specifies red cardstock of 160–220 gsm and white (PVA) glue for cardstock. For crepe paper, stretch the middle of each large petal gently to give it a curve before layering and hot-gluing around the stem, following Sara Davies’s method as reported by Jack Slater, Woman & Home.
Explore more ideas in the galleries DIY origami Christmas decorations and Christmas crafts with toilet paper rolls, each featuring several projects.